How To Make A Tote Bag From Upcycled Materials
To support the running costs of Moral Fibres, this post contains affiliate links. This means Moral Fibres may earn a small commission, at no extra cost to readers, on items purchased through these links.
Need a new tote bag? Don’t buy one – try making one instead! Portia Lawrie, author of the sustainable fashion book The Re:Fashion Wardrobe cleverly shows you how to make a tote bag from upcycled materials.
Are you an advanced sewist or crafter looking for a new way to reuse waste materials, such as old cushion covers, shower curtains, or old clothes? Portia Lawrie, author of the new book The Re:Fashion Wardrobe – published by Search Press – is here with an in-depth guide on how to make a stylish tote bag from entirely upcycled fabrics.
A good bag is an essential part of any wardrobe, and there are a near-infinite number of designs to choose from. None are more enduring, versatile or as simple to make, though, as the humble tote bag.
Vary the size and dimensions, handles straps, closures and hardware, and fabrics used. Line it, or don’t. Box out the corners, or don’t. There are many possibilities to make your tote bag personal to you.
Upcycled Fabric Choices
When it comes to making the tote bag, sewing two layers of material together, and leaving the top open, is the fundamental starting point of any bag.
The fabric you choose will depend on the purpose of your bag. For daily use, fabrics should be durable. Heavier fabrics like denim, canvas, curtain and upholstery fabrics are ideal and are often popular choices. However, don’t be afraid to get creative and consider less conventional choices. Neoprene, tarpaulins, shower curtains, laundrette bags, quilted throws and towels all have the potential to throw up some interesting and possibly novel results.
Don’t rule out lighter fabrics either. These can be interfaced to add structure and durability.
When selecting a fabric think about what your sewing machine can cope with, and use the right needles, thread, presser feet and machine settings for the job.
Walk through your design in your head. Think about how many layers of fabric your machine will need to sew through: where will seams intersect, and how will the layers build in the final stages?
I recommend swatch testing to see how your machine copes through that number of layers. Thinking
ahead like this gives you the opportunity to adapt your tote bag design before you start, rather than reaching the last few steps and finding the idea in your head simply isn’t going to work with the machine you have.
Choosing the Handles & Hardware For Your Tote Bag
Various handles, straps and hardware can be added, according to the tools and materials at your disposal and your personal preference/aesthetic. They can be made from the same material as your tote bag outer/shell (if you have enough left). Or they can be made from contrasting material harvested from old or broken bags.
Bag-making suppliers stock a wide range of ready-made handles, straps and hardware if you don’t have access to the ones you need. It’s wise to decide what handles, straps and hardware you’re going to add before you make your bag, as you may need to carry out some steps prior to attaching the lining.
How To Make A Tote Bag From Upcycled Materials
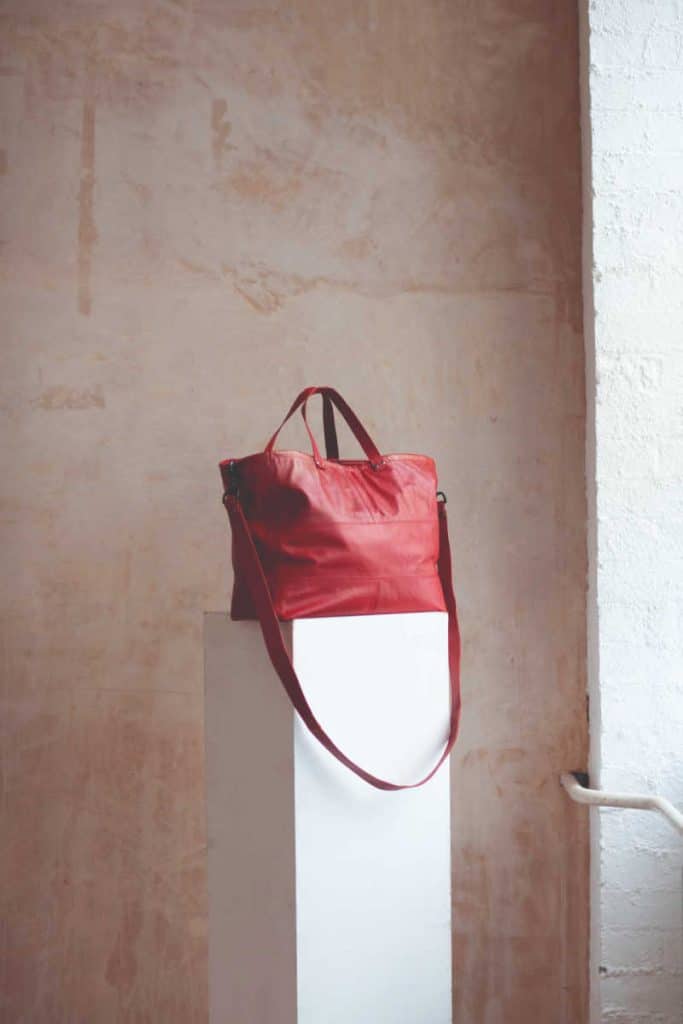
The finished size of your tote bag will be 28 x 38cm (11 x 15in), not including the handle and strap.
In this guide, I’ve used secondhand leather cushion covers bought on eBay and an old shirt for the lining. I then added some new hardware to elevate the overall look and finish.
If you’re using upcycled leather, then here’s a tip on how to sew leather seams:
- Sew the seam as usual, using a leather needle, Teflon presser foot and strong thread.
- Roller the seam open and flat using a leather roller/press.
- Glue the seam allowance down using a compatible glue. Weigh seams down with pattern weights
as they set.
You Will Need
● Source fabric, for the main tote bag outer/shell and facing. I used 4 cushion covers with leather fronts – each cover measured 40cm (15¾in) square.
● Donor fabric, for the main bag lining. I used 1 grey cotton shirt.
● Pattern weights
● Aluminium clips
● Strong thread, like denim thread
● Rivets and fixing tools
● Eyelets and fixing tools
● Heavy-duty trigger clasps
● Optional: leather glue; leather press/roller – a small rolling pin is a good alternative; non-stick/Teflon presser foot
Method
I’ve broken this down into three parts – the tote bag body, the handles and then the shoulder strap.
How To Make The Tote Bag Body
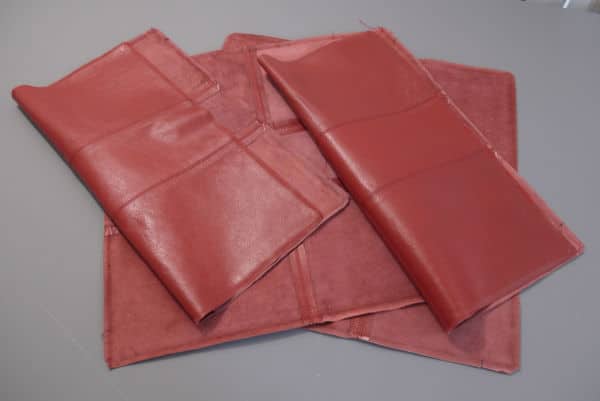
1. My covers had felt fabric on the back, and leather on the front. I began by completely deconstructing them, retaining only the leather fronts. Each of my deconstructed cushion fronts measured approximately 40cm (15¾in) square.
The zips on the original covers were not thrown away. Instead, I added them to my haberdashery stash for future projects. I also held on to the fabric cushion backs, to help me figure out my tote bag design – and to make a toile with – before cutting into the leather.
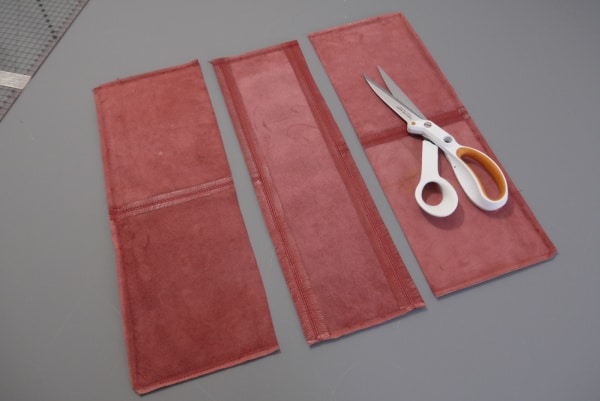
2. To make the side panels of the bag outer/shell, I cut out two narrow pieces from one cushion front, retaining the same height as the original front. As my cushion front featured two vertical seams, I used these as a guide for cutting my side panels. You could make yours wider or narrower if you wish, depending on how large you’d like your tote bag to be. My side panels measured approx. 15 x 40cm (6 x 15¾in).

3. I stitched the side panel pieces to an uncut cushion front, right sides together and matching the raw edges.
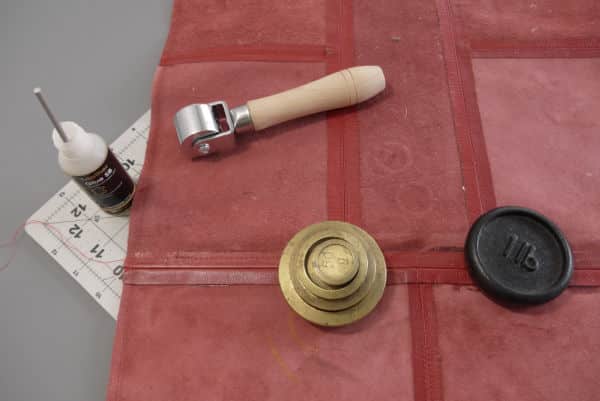
4. The seams were pressed open and flat. (Use a leather roller or rolling pin, if you’re working with leather, like me. I also used pattern weights and glue to hold down the allowances flat).
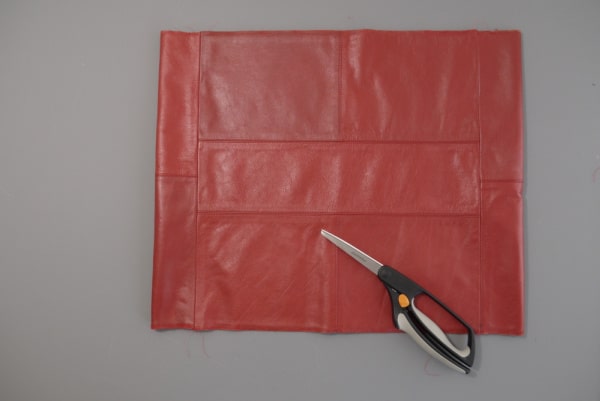
5. A third cushion front was then sewn right side together to the free edges of the side panels, making another large bag panel and creating a ‘tube’.

6. To create your bag lining, make another ‘tube’ from pieces that are the same dimensions as your bag outer/shell, using your donor fabric.
I wanted to add facing to the top of my bag lining, so the lining panels themselves were made a little smaller in height than the bag outer to accommodate, and making sure to allow for the seam allowances. I subtracted about 7cm (2¾in). From my shirt, I cut up two 15 x 33cm (6 x 13in) side panel pieces and two 40 x 33cm (15¾ x 13in) main bag panel pieces.
With the shirt front with a button placket, I made sure the button placket of the shirt front was flipped on its side before I cut it. And then I stitched vertical lines over it to form pockets.
At this point you could also add all manner of pockets and extras to the lining, using various elements of the shirt. For example, why not use the cuff placket as a key fob? Get creative!
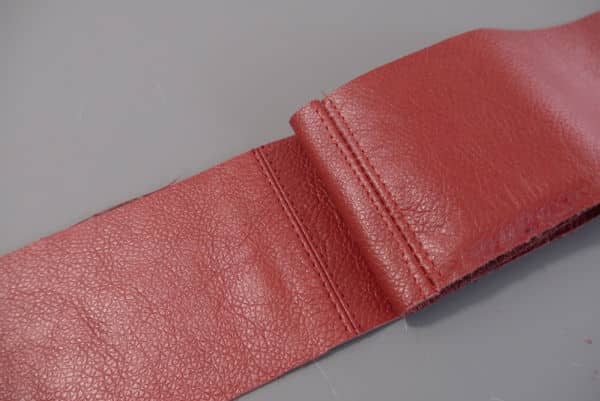
7. For the facing at the top of the bag lining, I cut several 7cm (2¾in) wide strips of leather from the remaining cushion fronts. I then joined the short ends right side together to make a “loop” that matched the circumference of the bag outer/shell. My loop measured approx. 95cm (37½in) long. The seam allowances were pressed open and flat (use a leather roller, glue and pattern weights, if you need these).

8. With the facing piece inside out, and raw edges matching, I sewed the facing to the top of the bag lining.

9. With the bag outer/shell turned wrong side out, I stitched across the bottom of the tube with a 5mm (¼in) seam allowance to close the bag base. The seam allowance was pressed open. I then pinched the corners of the bag, so the side seam was centred over the base seam. Then I clipped them together and then sewed straight across the corners at right angles. The corner triangles were then cut away, with a scant seam allowance.

10. Repeat for the bag lining, with a 5mm (¼in) larger seam allowance at the base. The distance between this line of stitching and the tip of the bag corner will dictate how boxy your bag is (in other words, how wide the base is). For a shallow base, sew a short distance from the tip. For a wider base, sew further away.
11. I turned the bag RS out and poked out the corners.

Optional step: If you want to provide structure to the base of the bag then you can recycle a piece of sturdy card or plastic. Cut it to the size of the base and then glue it to the base, on the inside, before proceeding to the next step.

12. The bag lining was turned the wrong side out, and the bag outer/shell turned the right side out. The bag outer/shell was then placed inside the bag lining, with the side seams of both bags aligned. I then sewed the lining and outer/shell right sides together, around the top edge only. Grading the seam allowances afterwards reduced bulk.
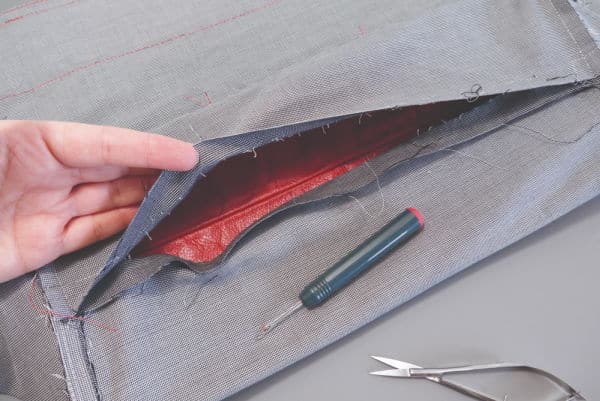
13. I carefully unpicked the base seam of the lining, almost to the side seams, to create a gap to turn through the tote bag.

14. Once the bag outer/shell was pulled through the opening in the base of the lining, I pulled and then pressed the lining away from the bag. I then under-stitched around the top edge of the lining/facing.

15. I closed up the base of the lining by machine. This could be done by hand with a slip stitch, if you wish.
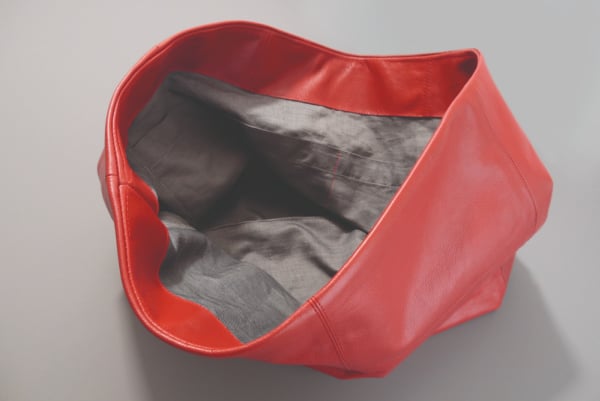
16. The lining/facing was pushed into position, on the inside of the bag, as shown. I secured the layers with clips and then topstitched the lining in place around the top edge.
Making The Tote Bag Handles

- I made the handles for my tote bag from the cut-away seams of the cushion fronts. I cut two strips, each measuring approx. 2.5 x 40cm. Then I turned under the short ends by 1cm (⅜in) to neaten. I then stitched these down and cut the seam allowances at angles to reduce bulk. The tote bag straps were then attached to the front and back of the bag with rivets, centrally.
Making The Shoulder Strap

1. The shoulder strap for the tote bag was also made from the remnants of my leather cushion fronts.
I stitched together six strips measuring approx. 7 x 20cm (2¾ x 7⅞in), with the right sides facing, to make a long strip. After pressing the seam allowances open and flat, I then folded the strap piece in half along the length, wrong sides facing.
The wrong sides were then glued together, and I edge-stitched all around. Each corner of the short ends were trimmed at diagonal angles to reduce bulk. Two strap-end tabs were made from cutaway seams from the cushion fronts. These measured approx. 2.5 x 8cm (1 x 3⅛in). The ends of both the strap and tabs had holes punched for the rivets. As the tabs sit over the ends of the strap to make them neat, as well as hold the clasps, I made sure the holes for the tabs and straps ends were the same distance apart.

2. I threaded the tabs through the tops of the trigger clasps. Then the tabs were wrapped around the ends of the strap, matching the holes. The strap and tabs (and with them, the trigger clasps) were then riveted in place.

3. Finally, large eyelets were installed at the tops of the tote bag sides to allow the strap to be attached.
Have A Play
Once you’ve made your tote bag, you don’t have to stop there. You could make keyrings and zipper pouches to match out of leftover scraps. Or you could use the same technique but omit the lining to make reusable shopping bags to carry with you. Think twill and denim, cotton bedding, shower curtains, and tablecloths as sources of textiles for these.
About The Re:Fashion Wardrobe
Portia’s book, The Re:Fashion Wardrobe, teaches you how to sew a sustainable capsule wardrobe that is tailored to you – and with it, help break the cycle of throw-away fashion.
Here you’ll kearn how to alter or create entirely new garments from pre-loved clothes or forgotten fabrics that are not only chic but don’t cost the earth.
Beginning with advice on equipment, fabrics and how to source your clothes for refashioning, Portia will then take you step-by-step through a collection of 11 garments that she has reworked, showing you just how easy it is to refresh or drastically change any piece of clothing you come across.
Every garment in the collection can be used to create a modern capsule wardrobe that you can wear throughout the year, and Portia has included advice on how to adjust the garments in the book to make versions suitable for different times of the year.
Useful sewing techniques with clear illustrations are included at the back of the book for you to dip into whenever you need them – from measuring and fitting through to garment deconstruction and construction.
This is not the “Becky home eccy” refashioning of old, or simply make-do-and-mend either. This is showing that with some time, basic sewing techniques and a dash of creative vision, a wardrobe you’ve made entirely from recycled garments and textiles can be as stylish, edgy and aspirational as anything the high street has to offer.
Looking for more crafting inspiration? Check out this handy guide on how to make a cushion from an old jumper.
Pin this tote bag tutorial for later:
Photography by Jamie Kendrick for Search Press
Inspired by this and want to do some more upcycling? Here’s how to make fabric-covered hangers from old clothes.
Found this post useful? Please consider buying me a virtual coffee to help support the site’s running costs.


